
This is work in progress – will keep updating on how we make it and how well it works.
Why a wildlife pond?
We decided we wanted to introduce a larger pond into the Orchard to create another habitat to attract and support more wildlife. A big thank you to Sustainable food who funded the pond in the spring of 2025 as part of their ‘Join the dots for Nature‘ project.
Getting started
We started by bringing in Digger Des to create the hole for the pond, then spent quite a bit of time researching how best to make it.


We had lots of discussions about how to approach the project and eventually decided we wanted to use clay instead of a plastic pond liner. This led to a lot of discussions and time researching so it’s taken us awhile to get started. We ended up having the clear the pond of weeds twice before eventually getting started with the clay.


Why use clay instead of a plastic pond liner?
We were keen to avoid introducing plastic into the ground. Pond liners can develop leaks over time and may need replacing, creating more plastic waste and cost. As plastic degrades, it can also leave harmful pollutants in the soil for generations to come. We liked the idea of using a natural material that could eventually return to the earth without leaving a plastic liner behind. A clay pond, when it eventually reaches the end of its life, will leave no harmful trace behind.
By documenting our process, we hope to encourage others to consider clay as a sustainable, low-impact alternative to plastic-lined ponds. We’re learning as we go, so watch this space!
Safety considerations
Public safety was another important consideration. The Orchard is a community space that hosts lots of events, with children often running around and exploring, so we needed to think carefully about the risk of someone accidentally falling into the pond and how to keep it safe. We bought wire mesh to cover the pond, and we will document how we approach this.
Bentonite clay
Clay has traditionally been used to make ponds watertight, and there are various methods to do so. Through research, we decided to use bentonite clay granules, natural clay that expands when wet. When mixed into suitable soil and compacted, it can help create a strong, impermeable barrier that prevents water leakage. It is used for lining and sealing ponds, lakes and reservoirs and is safe for aquatic life and plants can even grow in it although best not to use pond plants with strong root structure. There are some great instructions and information here.
Buying the clay
We bought our materials from Specialist Aggregates. We ordered 12 bags of bentonite clay granules, each weighing 20kg, giving us 240kg in total, for £241. The guidance suggest that one 20kg bag could cover around one square metre when worked into the top 50mm (approximately 2 inches) of suitable soil. If it’s sandy soil, you may need more clay granules. If it’s clay soil just 10kg per once square meter is enough. You can test your soil’s porosity by digging a test hole as deep as your future pond, filling it with water and seeing how fast it seeps away. We had seen that our dug pond naturally holds water in the winter rainy months so we guessed the soil is between fair & poor clay, which needs 10kgs – 15kgs of bentonite per square meter.
So hopefully 12 bags will be more than enough for our pond.
Making the clay pond!
We found a local guy, Jay Forrester who has made clay ponds before and gave us lots of advice on how to go about it – thanks Jay!
It was recommended to do the pond over a period of time, starting with the lowest level and doing it in increments as the water rises. Also, start in late summer after the very dry months and just before the winter rains. We put the clay down in early October.
Here’s the process that we followed. Starting 9th October 2026.
- Once the hole has been dug, you then remove a further inch of soil from the base layer and heap this soil up on the bank, removing any stones. This soil will be used to cover the clay over again. Jay lent us a great tool for loosening the soil – a long handled tiller / cultivator which was very helpful. You need to also ensure that the sides of the pond aren’t too steep otherwise the clay might not adhere.

- You then pour the clay granules into the base of the pond. We wore masks as the clay powder can be bad for your lungs. We used 5 bags for the base layer of our pond that was aprox 2.5 x 2. Aprox 1 bag per 1 square meter.
- We used the half-thumb test to ensure that all areas were at least an inch thick (half a thumb is a good measuring device).
- Then we put the clay granules just slightly up the bank. We were told it’s best to come back to do the sides once the base layer has been done first. The reason for this is that if you did have a big rain, the clay on the sides might wash down Put some stick markers showing where the clay has bee laid down


- Once it’s all raked flat, cover the clay granules with the soil that you removed and heaped up on the bank. Aprox 2 inches of soil (a full thumb measure!).

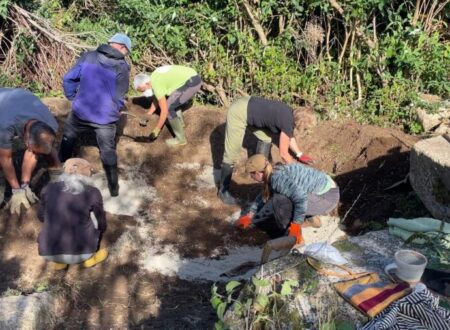

- Stomp this soil flat. It’s recommended to use machinery (a vibratory jack rammer is recommended) to compact the soil and sandwich the bentonite layer but instead a group of us just stomped it down with our feet.

- Cover the soil with large rocks. The clay will swell aprox 5 x when it gets wet and the rocks helps push the clay down and up the side of the bank. Rocks aren’t essential, the alternative is to get in and stomp the clay down after it rains. We just happened to have a large pile of rocks next to the pond and it meant that they can do some of that work for us. We will need to remove all those rocks again for the next stage.

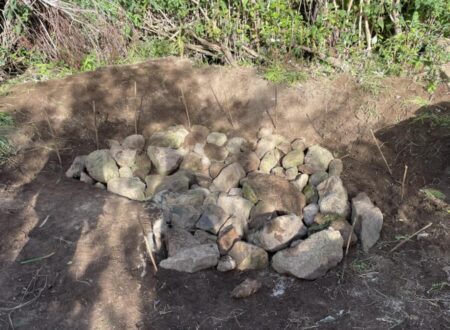
- Now we need to wait a while for the rain to fall and the clay to swell. The rocks will help to keep the clay compressed down. Once the clay has swelled & it’s rained a few times, we will then need to remove the rocks, get in and stomp it down further to compress it. This is called puddling.
- Bubbles will release over a couple weeks as it settles but after that, if you see bubbles it may be because there is a gap that needs filling with a bit of extra clay.
- Once the bottom area is holding water well, we will then start on the sides, removing soil, pouring on the clay granules, covering with soil and pushing flat (short planks of wood can help with that).
- It’s good not to rush doing the sides while you make sure that the base level is good, otherwise you’ll have to get into deeper water to fix it.
- If it gets a leak you can just pour the dry granules over the pond. Instructions say that the granules will be pulled towards the leak by the flow of water, settle and form an impermeable muddy gel-like layer to plug the leak.


Pond plants
We plan to add lots of pond plants. Add list here.
More to follow as we document the next stages of building our wildlife pond.
Useful links:
//www.bentonite-intl.com/bentonite-clay-for-ponds-3-w.asp – great instructions on how to use it.
//bethnalgreennaturereserve.org/projects/how-to-build-a-clay-pond – some nice advice on pond plants. This project uses clay liner which is a bit different to the granules, a more expensive option.
//www.youtube.com/watch?v=8F60na7mnSs&t=639s
This one makes it look so easy – they literally just sprinkled the clay on and filled up the pond and voila. From reading other instructions, it seems a bit more complex but it reassured us that perhaps we didn’t need machinery to compact the clay.
//www.youtube.com/watch?v=aIbqbRzZsGo
Same couple making a really large pond with 3 tons of clay using the same method – again simply sprinkling it on top of the soil.